Showing posts with label crafts. Show all posts

Thursday, May 15, 2014

Crocheting Blankets

During my leave of absence from the blogger world, I crocheted, a lot. I made ponies, pandas, tons of hats, monkeys, dolls. I even made a Darth Vadar! I kind of started a little business on the side and I've been making pretty good money. 

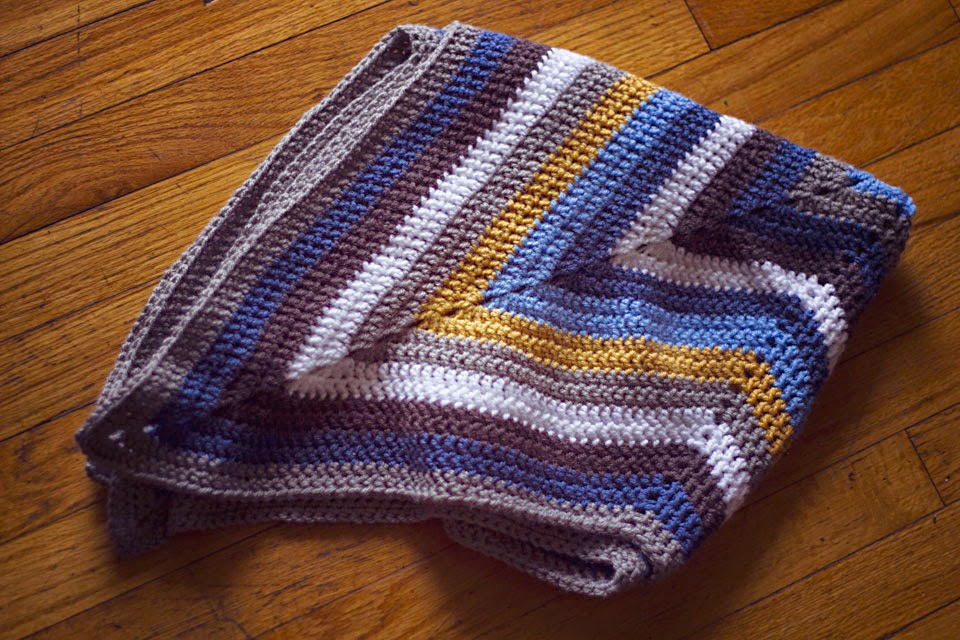
Crocheting became an outlet for me. It was therapy. I used crochet to cope, to deal with my anxiety and my depression. And while I love everything I've made, my favorite things are the two blankets pictured below that I made for Doc. (Well actually the ripple one was made for a friend's baby, but I totally failed at getting it in the mail, so Doc started using it.) 


It's gotten too hot to crochet more blankets, so I'm hanging up my hooks for summer, which oh em gee I haven't shown you my hooks! I bought my hooks from an Etsy shop, The Lemonade Shop back in February and they are seriously the loves of my life. 


It's the 10th and 11th Doctor from Doctor Who! Yoda, Captain America, Castiel from Supernatural, and Thor! All my favorite men. 

You can check out some of my work at my flickr stream, linked on the side of the page or checking me out on facebook, Bailey Belle Boutique.


Sunday, March 17, 2013

Extra! Extra! Read All About It! Easter is coming!!!!!

Easter is one of my favorite holidays. (I think I say that with every holiday and if I do, I'm sorry. They are all my favorite.) I just love spring! I love the colors, the flowers, the smells... THE BUNNIES! I love this time of year. I always find  myself in a good mood during spring time. It's hard to break my Easter spirit and I think spring is just what I needed to get my mojo back. Losing my son has been hard on me and finding motivation to craft hasn't been easy, but spring... spring was just the motivation I needed! 


I made the canvas using my silhouette cameo machine last night. It took maybe 5 minutes! And the eggs in the vase.. well I made those this morning.


Like with everything else I do, I wanted to incorporate Handsome in my project, so of course my first thought was purple eggs. But how boring would a vase full of purple plastic eggs look? I wanted to add some spice to it and I had TONS of newspaper laying around the house.


I cut my newspaper into strips of different lengths and painted a thin layer with purple acrylic paint. Make it messy. Leave some spots. 


Then I covered the eggs with modpodge and covered it with the paper. I wanted my eggs to have a messy, crumbled look, so I made sure it wasn't "perfect" and I crumbled up the paper and over lapped a lot of it.


And then I had pretty purple eggs to add to my Easter decor! Just another little way to add a piece of Handsome to our holiday! 

Thursday, July 19, 2012

Guest Blogger: Week Four


Hey everyone! My name is Imelda and I'm a full time mom to two little teenagers, ages 3 and almost 2 yr old. I'm usually up for anything new so being crafty is slowly growing on me, although I'd prefer to bake!
I first met Christina on Facebook through a Military Wives page when I first moved here. She then invited me over to do Zumba with her on her Wii. She is truly an amazing person to meet and I'm very glad I met her.
One day, while walking with my kids to go pick up an item I had purchased, my kids decided they wanted to play at the little park next to our house when we were walking back home. We stopped so they could play since it had been extremely hot during the week and days that we just never went out. There had been this little tikes picnic table just sitting there for two days straight with no one claiming it, so since no one had claimed it and we lived right next to the little park I called up my husband and had him pick it up and take it inside. When we got in from the park I finally got to take a good look at the table, it was all scratched up, had some cracks and pieces of plastic missing, but my kids loved it and it was actually perfect for them since they were still too short to sit on the chairs to the table. A couple of days before all this happened I had been browsing Pinterest and pinning "DIY crafts" and came across an upholstered little tikes picnic table exactly like the one I had just found and voila I had my first project to do!

I went to Hobby Lobby that weekend and purchased the fabric that I wanted to use. I picked John Deer theme since I'm from Texas and was raised most of my life  on a ranch. I also purchased vinyl to keep the fabric from ever getting dirty and to make it an easy clean up. I then followed the directions that the lady had said to do, which was take it apart, clean every piece of plastic, and then spray paint the sides. When I spray painted the sides the yellow spray paint I had bought wasn't sticking! Turns out I bought the wrong spray paint and not the one for plastic since the lady had said to just buy the cheapest spray paint in the color you wanted! Well while I let the runny spray paint dry I went inside and started arranging the fabric on the table and started stapling it down and then stapled the fabric down to the benches. I then arranged the vinyl and stapled that down as well with the help of my husband since it was a bit tricky getting the edges. When I was done with all that I went outside to check on the sides that I had spray painted in hopes that it would look good! Sadly it looked horrible and I was about to break down and cry because I wanted it perfect and neither me or my husband wanted to make a run to walmart to buy more spray paint. I then remembered I had black acrylic paint and sponge brushes and decided to attempt to paint the sides with that and hope for the best! Luckily, when I was done it gave it this black and yellow look which I really liked. Once everything was dry I put all the pieces together and my scratched up, cracked, pieces of plastic missing table looked brand new!! My kids immediately wanted to sit down and eat as soon as we had set it down because it was something new for them. So if you have a little picnic table that you are just tired of looking at, turn it into something that matches your decor and enjoy!


Thursday, July 12, 2012

Guest Blogger: Week Three!

Hi everyone! My name is Crystal. I am a part-time student, part-time book-keeper, and FULL time mom! I have three munchkins who are 8, 6, and 5. I have always been super crafty, my nickname growing up was Martha Stewart. I guess because if I see it I wanna do it! Cooking, sewing, crocheting, art, photography, or anything that requires a hot-glue gun and I am in!

 I met Chrissy when our families were stationed together in Camp Lejeune, NC. and we have kept in touch despite all the moves and years. So,when Chrissy told me she needed a quest to help out with a post, I was like "On it!" Now, we live in Arizona and it is HOTT here in the desert. I like my kids to be active and since school is out and the landscaping is not exactly the way it was when I grew up in Alabama (soft grass, lots of trees), I have to think of things to do inside that let them run around but do not wreck my house in the process.

 I am an avid Pinner, ok let's be honest, I am addicted to Pinterest (look me up!). SO I was on there one day and I was like what to do, what to do....hmmm...I have rolls of streamer paper, let's make THOSE!


and then let's do THAT! 


They really were not hard to make, the most difficult part was making each kid hold still while I measured the straps so that the jet-pack wasn't sagging on their lil booties. I hang on to EVERYTHING so I went out and dug through til I found two matching bottles that were the right size for each kid, tape, and string. I took the bottles and used clear packing tape to get them to stay together. 

Then I took electricians tape and the streamers layered them on and doubled up on the taping so it didn't fall off too easily. Then measured the string and tied AND taped that on. Whaaa-laaa! Awesome jet-pack :) I also saw on Pinterest where a mom used two pringles cans and tinfoil and she cut her streamers to look like flames. This mom apparently made her jet-packs while her children were not around. Juuuuust sayin'. Point is, this is a great re/up-cycling project that will keep your kids occupied for hours...I know it did mine. Just make sure to include an obstacle course for them to maneuver their jet-packs through and you won't see them for AT LEAST an hour. Have fun!


Wednesday, June 6, 2012

granny square blanket

I posted earlier in the year that I was learning to crochet. (As if I needed another hobby) And although I have crocheted many different hats, bonnets, headbands, leg warmers... even a very cute batman cape for Jake, I just didn't feel like a crocheter. I guess, it's because, before I started crocheting, when I thought about the art, I always thought of granny squares and since I hadn't done anything with granny squares, yet. I didn't feel like I could officially call myself a crocheter.

A couple nights ago, that all changed! 


 I have been anxious to try out Vanna's Choice yarns, because that seems to be the brand most popular crochet blogs use. I figured it must be nice stuff.  My hobby lobby has its yarns separated by brand and color (I'm sure they all do) and purple happened to be next to this grey. I was just going to get a dark purple to make a baby crown, but when I saw these 3 colors side by side, I had images of a pretty blanket in my head, so I bought all 3 colors and got started! 


Using the 3 colors, I was able to come up with 6 different color combinations for my squares and I've been able to make a couple of each, so far. I would like to have 12 of each, but I'm moving so slow that I may just make the blanket smaller. 


Want to make your own granny squares? I got my pattern from the link below. 

I promise to post the finished product! :D

Monday, May 28, 2012

Bored Bucket


Growing up, I cannot tell you how many times I said the words "I'm bored." My mom used to say that she hated hearing a child say those words and I never understood where she was coming from until recently...

 We had planned on making a summer bucket list, with a list of things we wanted to accomplish this summer. Once we made out our list, I realized that doing it all was not going to be possible with Handsome having a surgery in June and his string of follow up appointments. 

So I took to pinterest for another idea... And I stumbled upon a bored jar. A decorated jar that was full of pieces of paper with things to do, printed on them. The idea was that anytime the child said they were bored, they could pull a piece of paper out of the jar and whatever task was written on there, they would have to do. Somethings in the jar were fun activities, while some were... not so fun, like chores. 

Shaydes of Life is the blog where I got the idea from, if you wanna check out her blog! 


After reading her blog, I decided to make a bored bucket using scrapbook paper and an old grits container, but instead of filling it with small activities, we filled it with the items from our summer bucket list. I knew we couldn't accomplish it all in one summer, but narrowing it down just didn't seem as fun. This way whenever we get a free day, we can just pull something out of our bucket. It adds some mystery to our summer activities! 

I wrote our activities on popsicle sticks, because I was too lazy to type up and print our list. :( 


Friday, May 18, 2012

No Germs Allowed

When Handsome gets sick, a common cold for him is as severe as a case of rsv and that stomach bug that we got over in 24 hours landed him in the hospital for a week. On top of that, when he is sick his threshold for seizures is significantly lower, putting him at a high risk for them. Avoiding germs, is VERY important around here. We try to stay as healthy as we can, to keep him as healthy as we can. We go through bottles of hand sanitizer and cans of lysol like candy. We avoid taking him into public places like schools. And we have told people they couldn't come to visit, because they recently had a cold. 

Sometimes, I worry that we are being rude to our friends, but my son can't get sick, so what else am I suppose to do? 

I thought maybe if I made a generic type sign to put in front of the house, that maybe that wouldn't be as rude as flat out telling someone, "Hey, you can't come over." And with all my cleaning and reorganizing I have been up to I found a board from the bottom of a dresser drawer that I thought would be perfect for my sign! 

Photobucket

Heidi, LB, and I spent sometime on the front lawn with our paints and our board, trying to come up with a blunt, but polite (and pretty) way of saying, stay away if you are sick!

Once we came up with our saying we wrote it down on an old envelope, so we wouldn't forget and we got out our paint brushes and got creative.

Photobucket

Once we finished painting our sign we stuck it up next to our front door! Hopefully, people don't see it as rude and hopefully military housing folks don't have a problem with it.

BUT....

I still felt like that wasn't enough to keep the germs out of the house so....

Photobucket


This sign, now hangs in my foyer, right before you enter the living room and a bottle of hand sanitizer sits in front of it on the shelf. 

Thursday, April 26, 2012

Boho Princess Headband Tutorial


A few months ago, I ordered Heidi a lace romper on GroopDealz. I didn't really know what I was going to do with the romper. I just knew that it was an amazing deal and I had to take advantage of it. Plus, my husband left his credit card at home that morning... Oops!  When I got the romper and tried it on her, I knew I was going to need a headband of some sort to go with it. I had planned on just buying something on Etsy, but never got around to it. 

And it's a good thing I forgot to order one on Etsy...

Because I was looking at my blog, earlier, and noticed I haven't posted a tutorial in a LONG time, so I rummaged through the house for something I could throw together quickly. Unfortunately, while I was spring cleaning, I threw away a lot of my extra craft supplies, to make room for all my yarn. I was left raiding my husband's hardware drawers. 

And this is what I came up with... 


Photobucket

The Boho Princess Headband

Materials used:
Jute Twine (can be purchased at craft stores or the hardware department of Walmart)
crochet hook (I used a size F)
a small strip of fabric
fabric glue

The headband is simply a chain of crochets. I just kept making chains until the headband was long enough to fit around Heidi's head. Then I joined the last chain to the first chain with a slip stitch and fastened off the chain. Then using a tapestry needle I weaved in the ends of my yarn. 

***If you do not know how to crochet, you can cut your jute into three strips and braid it, tying knots in each end. Then leaving a tail with your jute on each side to tie together when you are done. ***

Now that you have a headband, you need to embellish it!

Cut a strip of fabric. (I used a one of Skywalker's old tshirts) How long and how thick you cut your strip will depend on how big you want your rosette to be. 

Tie one end of your fabric strip in a knot. Begin twisting your fabric around the knot, applying fabric glue to help hold it in place.

***Here is a photo to help show you what I'm talking about. You will want to apply your glue to the side of the fabric, gluing it to the knot. Then you just keep wrapping it around and adding glue, until it's the size you want***

Photobucket

Once you finish wrapping and gluing your rosette, you can take another piece of your fabric and glue it to the back of your rosette. 

Trim any excess fabric around the rosette and glue it to your headband.

Once it dries, try it on your Boho Princess and don't forget to take a picture for me!


Photobucket


Photobucket

Monday, March 26, 2012

Purple hat for Purple Day!

Purple Day, for epilepsy awareness, is March 26th. Heidi needed a new accessory to wear with her purple shirt, so I got another excuse to experiment with my new hobby, crochet.

Photobucket
Photobucket

and I think this is my favorite thing, I have made so far.

I didn't really follow a pattern for it. I just knew I wanted a busboy hat, but couldn't find any decent patterns for free, so I just sort of conjured up my own thing, based off the free ones I found.

Photobucket
Photobucket
Photobucket
Photobucket
Photobucket

I know they say parents are bias, but I swear my daughter is the most beautiful person, EVER... and you know where she got it from... HER MAMA!

Thursday, March 22, 2012

Decorating for Easter!

Something about spring decor makes me HAPPY! I don't know if it's the bright colors or if it's because seeing spring decorations means, my birthday is coming, but I love adding pastel colored things around the house, even if it's only for a few weeks. This year, I got to use Spring as an excuse to practice my new hobby, crochet. My friend, Crystal introduced me to this awesome website, ravelry.com. It has tons of free patterns and I happened to find a free pattern for these eggs! How cute are they! You can find the pattern and make some, too, CLICK HERE

Photobucket
Photobucket
Photobucket
Photobucket
Photobucket

Friday, March 16, 2012

The Sock Monkey Hat.

My second crochet project was a sock monkey hat. I always wanted one for LB, since he loves monkeys, but I just couldn't bring myself to buy one with how rough he is on things. The boy can't keep anything clean and if it can be taken apart, he takes it apart. It's not that he's destructive.In fact, it's the complete opposite. He likes to fix things. He just likes to fix things that aren't broken.

I spent a large portion of Wednesday night searching blogs by other people who crochet for an easy second project and I stumbled upon a free sock monkey pattern. Now, I really didn't think I should be jumping into something that complex after just a little over a week of crocheting, but I really wanted a sock monkey hat...

I stayed up half the night again last night working on it and then today while the kids were at school, LB helped me finish it off and then he modeled it for me, so I could show you all.

Photobucket
Photobucket
Photobucket
Photobucket
Photobucket

And we just HAD to do it... See no evil...

Photobucket

Speak no evil...

Photobucket

Hear no evil

Photobucket
Photobucket

The hat hasn't exactly stayed together. One of the eyes fell off around dinner time. LB was wearing it while playing with Belle and somehow the eye popped off. I guess, my hats are good for photo props, but for playtime with a 3 month old puppy, not so much.

I, also, can't figure out how to make my seam less noticeable. You can really tell where I switch rows and the perfectionist in me can't stand it. I don't know if I am doing something wrong or if it is something I will just figure out with practice.

Now, Skywalker and Heidi are on my case about making them hats, so I will probably have two more hats to show you soon. Then I want to work on some things for around the house, like baskets, dish cloths, rugs, and some throw blankets. I'm so excited about my new hobby!